Overview
The GovDash Calendar brings meetings, milestones, deadlines, and other scheduled work into one shared view. You can review your schedule by month, week, or day; create one-time or recurring events; add participants; track responses; organize events with tags; and connect events to relevant GovDash records. Key dates from your open opportunities and tasks also appear on the calendar automatically, so you can see how deadlines across opportunities overlap.
Use the Calendar to keep scheduled work close to the opportunities, proposals, contracts, tasks, people, companies, agencies, and other records your team manages in GovDash.
Calendar is currently a Research Preview feature, so it may change as we keep improving it.
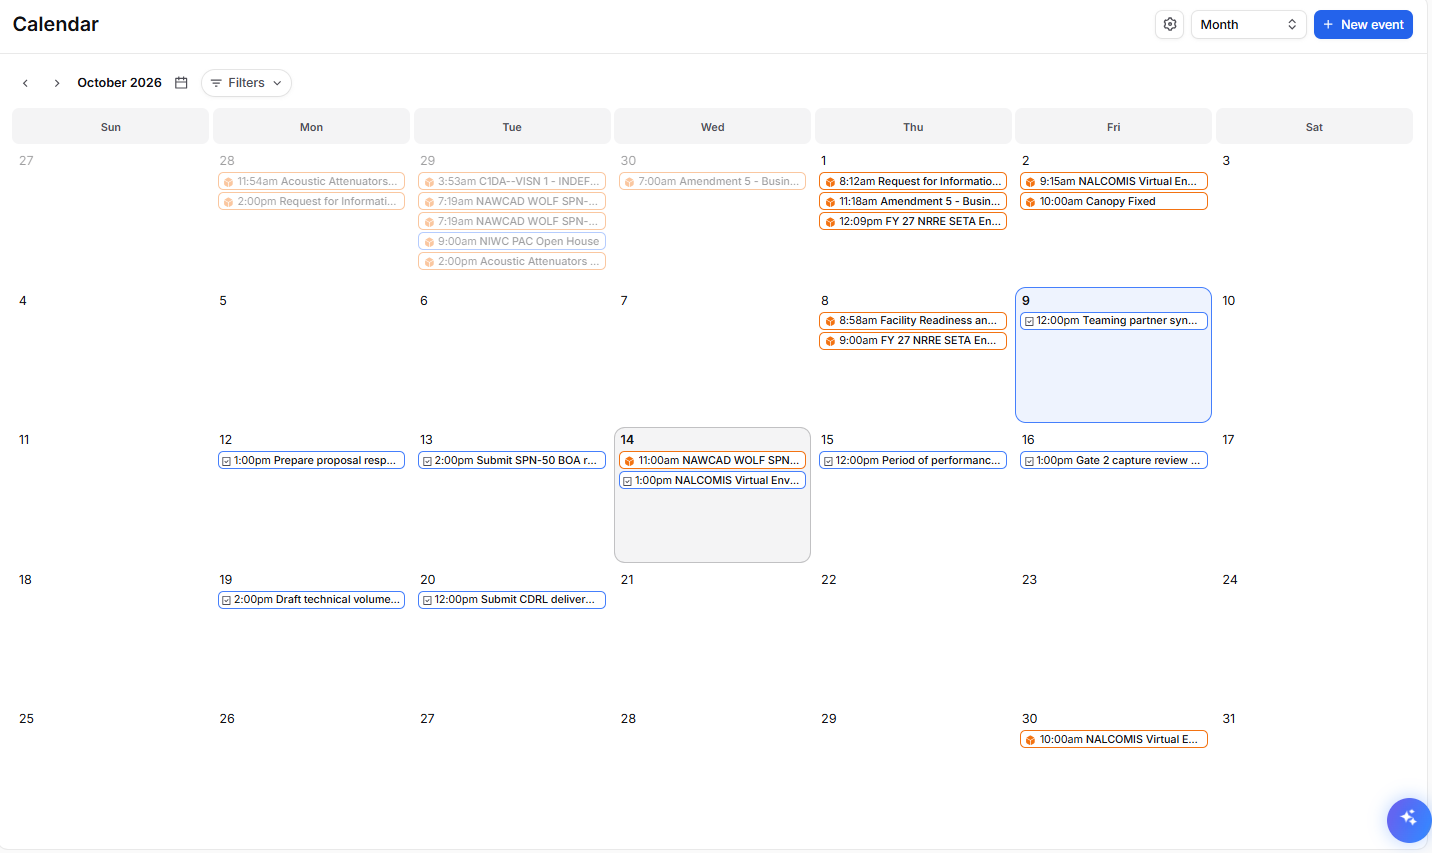
Open Calendar
From the main GovDash navigation, select Calendar.
Choose Month, Week, or Day from the view selector.
Use the previous and next controls to move through dates, or select the calendar icon next to the date to jump to any date. When you are viewing a different month, week, or day, select Today to return to the current date.
GovDash remembers your most recently selected calendar view, so the next time you return, Calendar opens in the view you last used.
Select the settings icon in the Calendar toolbar to open Calendar settings.

Tip
To see your Google Calendar meetings in GovDash, connect your calendar. To learn how, see Calendar Sync.
Filter events
Filters help you focus on a specific type of work without changing or deleting any events.
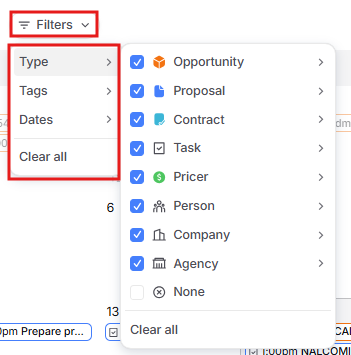
Select Filters in the Calendar toolbar.
Choose what to filter by:
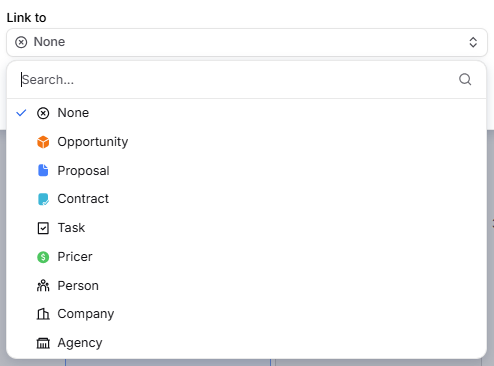
Type: Show events linked to a type of GovDash record (Opportunity, Proposal, Contract, Task, Pricer, Person, Company, or Agency), or select None for events with no linked record. Point to a type to search for and select specific records, such as a single opportunity.
Tags: Show events with one or more of your team's calendar tags.
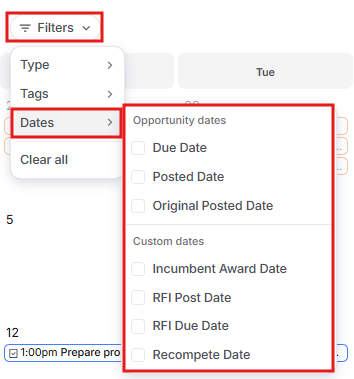
Dates: Choose which opportunity dates appear: Due Date, Posted Date, and Original Posted Date under Opportunity dates, or your team's own date fields under Custom dates. When no dates are selected, all opportunity dates appear.
Review the filtered calendar.
Select Clear all to return to the complete calendar.
GovDash remembers your filters, so they are still applied the next time you open Calendar.
Tip
Tags are labels your team creates. Type describes the GovDash record connected to an event. Dates control which opportunity dates appear. You can use any of these filters together.
View teammates' schedules
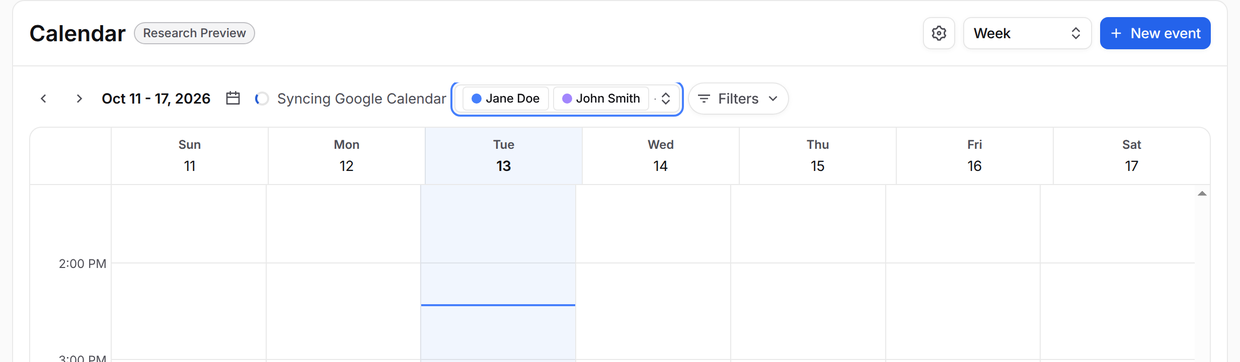
Use Schedule with to see your teammates' events next to yours, so you can find a time that works for everyone.
Select Schedule with in the Calendar toolbar.
Search for and select one or more teammates.
Review the calendar. Each teammate gets their own color, and their events appear next to yours.
Events you don't have access to, such as a teammate's private events, show only as Busy, with no details. To stop seeing a teammate's schedule, open Schedule with and deselect them.
Create an event
Select New event. You can also select an empty day in Month view, or click and drag across times in Week or Day view, to start an event with the date and time filled in.
Enter a title for the event.
Choose the date, start time, and end time. For an event without specific times, select More options and set All day to Yes.
Under More options, confirm the event's time zone.
Add any optional information, such as a location, description, tags, participants, or a linked GovDash record.
At the bottom of the form, choose the visibility (Team or Private) and classification that match the event's content.
Under More options, add a recurrence schedule if the event repeats.
Select Create event.
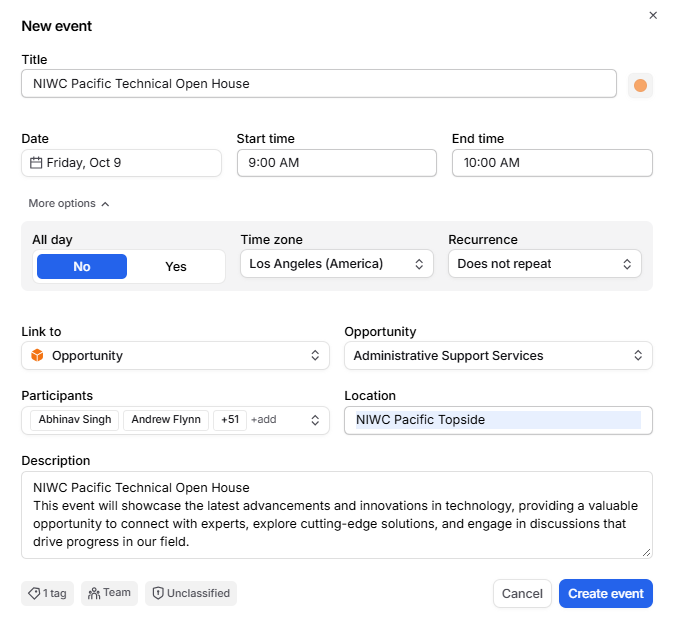
The create-event form can include the following details:
Title: The name displayed on the calendar.
Date, Start time, and End time: When the event happens. The end must be after the start.
All day: Use for milestones, deadlines, holidays, and other items without specific start and end times.
Time zone: The time zone the event's start and end times are based on.
Location: The meeting place or location details.
Description: Notes, context, agenda information, or other details participants may need.
Tags: Team-created labels used to organize and filter calendar events.
Color: The color the event shows on the calendar. When an event is linked to a GovDash record, the color comes from the record type. Otherwise, select the circle next to the title to choose a color.
Visibility: Choose Team to share the event with your team, or Private so only you and the participants you invite can see it.
Security classification: Select the classification appropriate for the information included in the event.
Participants: The GovDash users invited to the event. As the organizer, you are automatically marked as attending, so you do not need to add yourself.
Linked record: An optional GovDash record associated with the event, such as an opportunity, proposal, contract, task, person, company, agency, or Pricer record.
Recurrence: The repeat schedule and, when applicable, the date or number of occurrences when the series ends.
Tip
In Week and Day views, click and drag across a time range to start a new event for those times.
Create a recurring event
Use recurrence for meetings, reviews, reminders, and other events that follow a regular schedule.
Select New event to start a new event. You set the repeat schedule when you create the event.
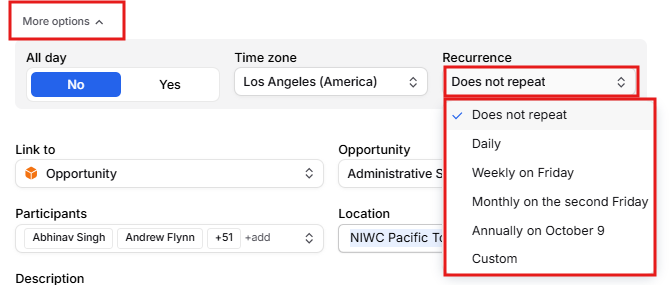
Select More options, then open the Recurrence menu (it shows Does not repeat until you choose a pattern).
Choose Daily, a weekly, monthly, or annual option based on the event's date (for example, Weekly on Friday or Annually on October 9), or Custom to set your own schedule.
In Custom recurrence, set Repeat every, choose the days under Repeats on for weekly schedules, and choose when it Ends: Never, On a specific date, or After a number of occurrences. Then select Done.
Select Create event.
View event details
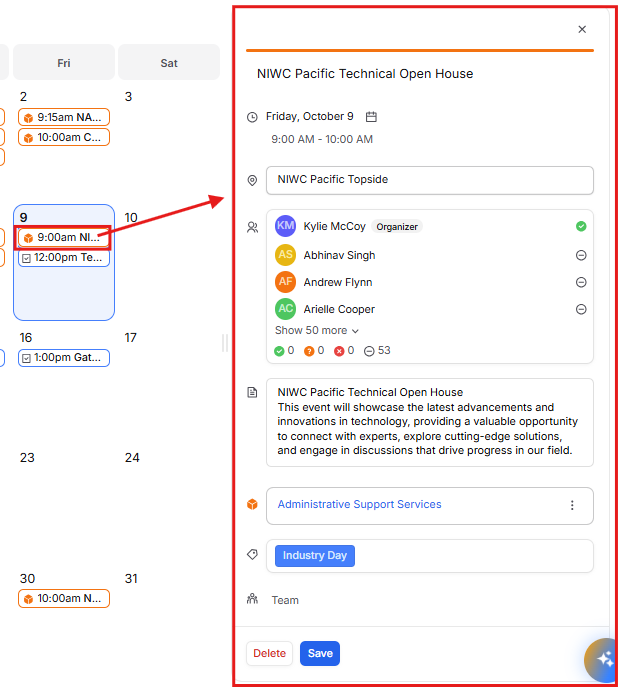
Select an event on the Calendar page to open its details in a side panel next to the calendar, so your schedule stays visible. The panel shows the event's time, location, description, tags, visibility, linked GovDash record, and participants, including the organizer and each person's response (Yes, Maybe, No, or Pending). If you are invited, select Yes, Maybe, or No in the panel to respond.
On the Calendar card on the Capture dashboard, selecting an event opens a quick preview instead. Opportunity dates also open in a quick preview, even on the Calendar page.
Edit an event
Select the event on the Calendar page to open the side panel.
Update the details directly in the panel.
Select Save.
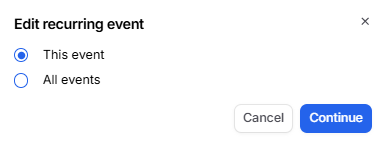
When you open a recurring event, GovDash first asks which events in the series your changes should apply to. You can change this later with the Applies to menu at the top of the panel:
This event: Changes only the selected occurrence.
This and following events: Changes the selected occurrence and the events that follow it.
All events: Changes the complete recurring series.
This and following events appears only when you open an occurrence after the first one in the series.
Delete an event
Select the event on the Calendar page to open the side panel.
Select Delete.
Select Delete again to confirm.
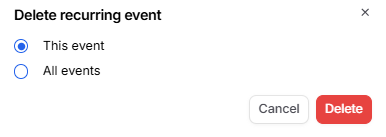
For a recurring event, choose whether to delete only the selected occurrence, the selected occurrence and following events, or the complete series. Review the selected scope before confirming because deleting an event cannot be undone from Calendar.
Manage calendar tags
Calendar tags are custom team labels that make events easier to organize and find. For example, a team might create tags for reviews, customer meetings, deadlines, or internal planning.
You can manage tags right from the Calendar page. Select Filters, then Tags, then Edit Tags to add, rename, recolor, or delete tags.
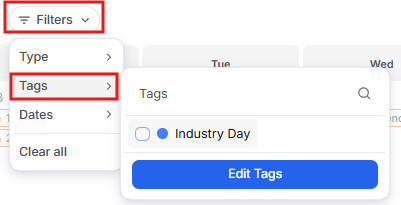
You can also manage tags in Calendar settings:
Select the settings icon in the Calendar toolbar, or go to Settings and select Calendar.
In Calendar Tags, create a new tag, or edit or delete an existing tag.
Return to Calendar and add the tag to events as needed.
After a tag is added to events, select Filters, then Tags, in the Calendar toolbar to focus on those events.
Connect an event to a GovDash record
Link an event to a GovDash record when the scheduled work belongs to a specific opportunity, proposal, contract, task, person, company, agency, or other supported record.
Start a new event, or select an existing event on the Calendar page to open the side panel.
Choose the record type under Link to. In the side panel, first select the more options icon (three dots) next to the linked record field.
Select the GovDash record. In the side panel, select Done.
Select Save.
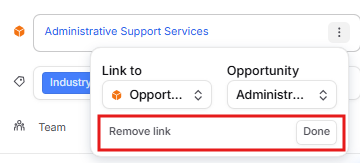
To unlink a record, open the same menu in the side panel and select Remove link. Events you create from an opportunity's calendar are linked to that opportunity automatically, and that link cannot be changed.
The linked record appears in the event details. Select it to open the associated GovDash page.
Opportunity and task dates
Calendar automatically shows key dates from your work, so you do not need to create events for them:
Opportunity dates: Dates such as Due Date, Posted Date, Original Posted Date, and your team's custom date fields. Custom dates show as all day entries, and a date range shows as two entries, one for the start and one for the end.
Task due dates: Due dates of open tasks. Completed and canceled tasks are left off.
Only opportunities that have not been submitted yet appear. Opportunities that are submitted, in evaluation, won, lost, canceled, or marked No Bid are left off.
These dates come from the opportunity or task, so you cannot edit or delete them on the calendar. To change one, update it on the opportunity or task. Use Filters, then Dates, to choose which opportunity dates appear.
Calendar on opportunities and the Capture dashboard
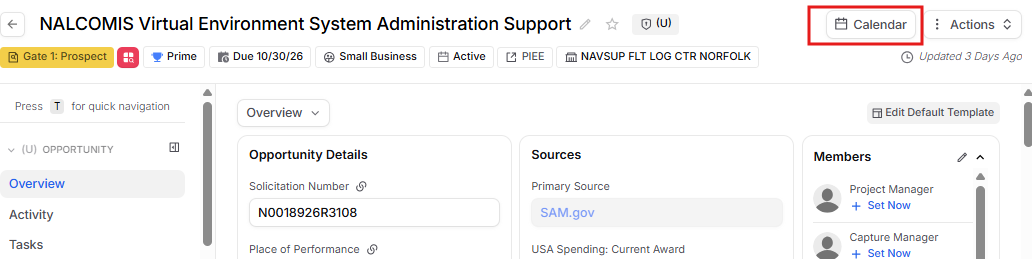
Each opportunity has a Calendar button that opens the events linked to that opportunity. New events you create there are linked to the opportunity automatically. You can switch between Month, Week, and Day, and GovDash remembers your choice. Select an event to open its details in the side panel.
The Calendar card on the Capture dashboard shows events linked to your opportunities, along with opportunity dates. Select Calendar at the top of the card to open the full Calendar.
Calendar permissions
What you can do in Calendar depends on your role's Calendar permissions:
Read: See the Calendar page, events, and the Calendar card on the Capture dashboard.
Create: Create events.
Edit: Edit events.
Delete: Delete events.
Manage Settings: Manage Calendar settings, such as calendar tags.
If you need different access, ask your GovDash administrator.
FAQ
Can I create an event that lasts more than one day?
Not right now. Each event you create in GovDash happens on one date, and the end time must be later that same day. For work that spans several days, create a Daily recurring event that ends after the number of days you need.
Can I change one event without changing the complete recurring series?
Yes. When you edit or delete a recurring event, select This event to apply the change only to the occurrence you opened.
How do I change an event and every event after it?
Edit the occurrence where the change should begin, then select This and following events.
What is the difference between a tag and a linked record?
A tag is a team-created label used to organize and filter events. A linked record connects the event to a specific item in GovDash, such as an opportunity, proposal, contract, task, person, or company.
Can I make an event private?
Yes. Select Private for the event's visibility. Only you and the participants you invite can see a private event. Use Team when the event should be shared with your team.
Why does an event show a different time for another teammate?
Calendar events use time-zone-aware scheduling. Confirm the event's selected time zone when creating or editing it, especially when participants work in different locations.
Why can't I edit some dates on the calendar?
Opportunity dates and task due dates come from the opportunity or task. Update the date on that opportunity or task, and the calendar updates to match.
Why don't I see the Calendar?
Your role needs the Read permission in Calendar. Ask your GovDash administrator to update your role.