Before you begin
In order to successfully connect Salesforce to GovDash, you must be a Salesforce administrator, and a GovDash administrator. This is required in order to grant GovDash permission to access your Salesforce.
Connecting Salesforce
To connect Salesforce to GovDash:
Access the Salesforce Integration page in GovDash.
Click Connect Salesforce on the right hand side.
Login to your Salesforce account that you want to connect to GovDash.
Salesforce will process the connection, and bring you back to GovDash for configuration.
Initial Configuration and Sync Settings
GovDash provides multiple options for syncing your Salesforce opportunities into your GovDash Pipeline. You can configure your Salesforce connection and sync settings on the Capture Settings page, located within your GovDash Settings.
Create Only Sync
This setting will only create opportunities in GovDash from your Salesforce pipeline, it will not overwrite any of your opportunities within GovDash.
Override Sync
This setting will move your opportunities within GovDash to the stage that they are currently set to within Salesforce, based on your linked/mapped phases. This option is useful for teams where Salesforce will be your source of truth, and you want GovDash to stay in sync with changes made in Salesforce.
Bidirectional Salesforce Sync (Webhooks)
GovDash supports bidirectional sync to Salesforce through webhooks. This will allow GovDash to communicate opportunity creation, deletion, and updates directly to your Salesforce pipeline. For more information on how to configure this integration, please see our support article here.
Syncing Opportunities
The Salesforce integration offers multiple sync options depending on your needs.
One Time Sync
You can perform a one time sync by selecting the Sync Salesforce Opportunities button on the right hand side. You will then be prompted to map your phases from Salesforce to GovDash, and GovDash will process your sync and let you know once the sync has been successful.
This sync is preferred if you only wish to bring your opportunities over and not keep your Salesforce phases in sync with GovDash.
.png)
Automating Sync
This setting allows you to automatically sync your Salesforce opportunities using your set sync setting. This can be enabled by selecting the checkbox under the Phases heading after linking your phases. The automatic sync will run every 30 minutes and respect the Sync Settings selection you’ve made.
.png)
Linking Phases
If you would like to have Salesforce be your source of truth and sync your phases and opportunities to GovDash, select the Link Phases button under the Phases heading.
.png)
GovDash will prompt you to map your phases from GovDash to your phases within Salesforce.
.png "image(10).png")
You will then be prompted to select any additional phases within Salesforce that you'd like to link to GovDash.
.png "image(33).png")
You may rearrange your phases and choose color options in this step, or at any time from the Capture Settings in GovDash.
.png "image(34).png")
If you'd like to link your phases and sync your opportunities, select Link Phases & Sync Opportunities, otherwise select Link Phases to only link your phases to GovDash without a sync.
Tracking/Mapping Salesforce Fields
Before You Begin…
We highly recommend creating your custom fields within GovDash before attempting to map your Salesforce fields. Please check our support article here for guidance.
Using the Track Field button, you can map additional Salesforce fields to GovDash, such as due dates, descriptions, NAICS codes, opportunity values, and more.
.png)
Select your GovDash Opportunity Field and Salesforce Object, and then choose your field that you’d like to map from Salesforce → GovDash using the Salesforce Field drop down.
Salesforce Object/Table Support
We currently only support the Opportunity table in Salesforce, but this may change in future updates.
.png)
This will link the fields together, which will sync the data within the opportunity’s fields on your next successful sync.
Custom fields that you’ve created in GovDash can be mapped to your Salesforce fields as well!
What Happens When Fields Don’t Match?
If you are trying to map fields that do not contain the same data between GovDash and Salesforce (such as a NAICS selector that doesn’t have the same code layout/description, or Agency list that spells agency names out differently) and a sync is attempted, GovDash will show
nullwithin that field in your Pipeline opportunity Overview tab.
We recommend utilizing Custom Fields within GovDash for these types of fields, which you can map and ensure that the options match between GovDash and Salesforce, which is especially useful for pick lists.
Unsupported Custom Field Types
Currently there are four unsupported custom field types for mapping to Salesforce. We are working to support these as soon as possible:
Number Range
Currency Range
Date Range
Multi-Select
Direct Support for Lookup Fields (See Mapping Lookup Fields to GovDash Section for our recommended solution)
Linking Existing GovDash Opportunities to Salesforce Opportunities
If you have the same opportunities in your GovDash Pipeline already within Salesforce and you’re setting up the integration, you can link these opportunities together through field and ID mapping using the steps below. This ensures that when Salesforce is synced to GovDash, it is able to identify your opportunities within your GovDash Pipeline and update the existing opportunities without creating new ones.
Note
This will not update opportunities from GovDash → Salesforce without setting up webhooks. Webhooks must be configured before information can be sent out of GovDash to Salesforce. For information on configuring webhooks, please see our guide here.
1. On the Salesforce side, your team will need to create a new field/column titled GovDash_Opportunity_ID. This field will contain the opportunity ID from within GovDash, which will be used to "match" the opportunities upon import/sync to GovDash.
2. For any opportunities that exist between both systems, using this GovDash_Opportunity_ID field, enter the opportunity ID of the opportunity within GovDash (found within the URL bar when you're in the opportunity) into the Salesforce side/version.
.png)
3. When configuring the Salesforce integration in GovDash and mapping the fields, ensure that the GovDash Opportunity ID field is mapped to the External CRM Identifier ID.
.png)
4. Initialize the opportunity sync with the Override option. By mapping these fields ahead of time, this ensures that Salesforce has the GovDash ID mapped, which will update the GovDash opportunities with the Salesforce data.
Mapping Lookup Fields to GovDash
While the integration doesn’t directly support lookup fields (as these fields in Salesforce reference an ID rather than a readable value), you can use the steps below to create a field that extracts the value from the lookup field into a value that is readable (and mappable) to GovDash, while keeping the two fields completely in sync.
Creating and Mapping Lookup Field Steps
Before you start: how lookup field naming works
Salesforce uses two different naming patterns for lookup fields, and the formula syntax differs slightly between them. Identifying which one you're working with up front will save time.
Field type | API name pattern | Formula reference pattern |
Custom lookup | FieldName__c | FieldName__r.Name |
Standard lookup | FieldNameId | FieldName.Name |
User lookup (standard) | OwnerId, CreatedById | Owner.Name, CreatedBy.Name |
In short:
For custom lookup fields, replace __c with __r to traverse the relationship.
For standard lookup fields, drop the Id suffix. There is no __r involved.

Standard Salesforce Fields
Custom Salesforce Fields
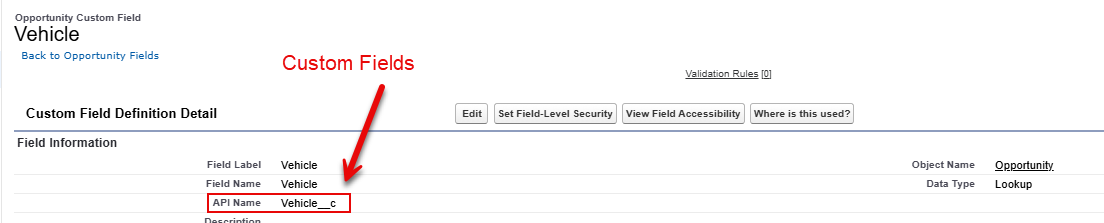
Step 1: Find your lookup field's API name
Go to Setup.
Go to Object Manager.
Click Opportunity
Click Fields & Relationships.
Under the Data Type column, find the field with the Lookup data type.
Click the field name to open its detail page and copy the Field Name (API name) exactly as shown.
How to recognize which pattern you have:
Ends in __c → custom lookup (e.g., Vehicle__c, Partner__c).
Ends in Id with no underscores → standard lookup (e.g., AccountId, OwnerId).
Step 2: Confirm the lookup object
On the same field detail page, find the Related To value. This tells you what object the lookup points to and which fields are available to reference. For most lookups, the Name field on the related record is what you want to surface.
Step 3: Create the Formula (Text) field
While still in the object's Fields & Relationships page, click New.
Select Formula and click Next.
Enter a Field Label and Field Name.
Set Return Type to Text and click Next.
Step 4: Apply the formula
Custom lookup fields
Replace __c with __r and append .Name (or another field on the related object).
Lookup field API name | Formula |
Vehicle__c | Vehicle__r.Name |
Agency_Description__c | Agency_Description__r.Name |
Partner__c | Partner__r.Name |
Standard lookup fields
Drop the Id suffix and append the field you want from the related record. These are the most common standard lookups on the Opportunity object.
Standard lookup | API name | Formula |
Account | AccountId | Account.Name |
Primary Campaign Source | CampaignId | Campaign.Name |
Record Type | RecordTypeId | RecordType.Name |
Price Book | Pricebook2Id | Pricebook2.Name |
User-based fields (Owner, Created By, Last Modified By)
User lookups don't expose a single Name field, so you typically concatenate first and last name using the & operator. The same patterns apply to CreatedBy and LastModifiedBy.
Goal | Formula |
Full name | Owner.FirstName & " " & Owner.LastName |
Owner.Email | |
Username | Owner.Username |
Step 5: Validate and save
Click Check Syntax. You should see No errors.
Click Next.
Set Field-Level Security if needed.
Add the field to your page layout.
Save.
Once saved, the new Formula (Text) field will be available to map in the GovDash Salesforce integration alongside your other Opportunity fields.
Step 6: Map the Field in GovDash
Navigate to Capture Settings in Settings
Create the corresponding custom field for your new formula fields
Click Track Field, select your GovDash field, and then the new Salesforce formula field, and then Confirm to save.
On your next sync (whether manual or automatic, depending on your settings), the new formula field data will sync showing the actual value of that lookup field, rather than the key.
Disconnecting Salesforce
To disconnect your Salesforce account, select the Disconnect Salesforce Account button above the Sync Settings.
.png)
Troubleshooting
I am receiving an OAuth Error when trying to connect my Salesforce account
If you see an OAuth error when trying to connect GovDash to Salesforce, especially one that mentions “app must be installed in org”, this usually means Salesforce is blocking the connection because the connected app has not yet been approved by an administrator.
How to Identify This Issue
You may be experiencing this issue if:
You see an OAuth error after clicking Connect Salesforce in GovDash
The browser URL or error message includes:
app+must+be+installed+in+orgor similar language about the app not being installed
The Salesforce connection fails immediately, even when logged in as an Admin
What to Check First
Confirm that:
The user attempting to connect Salesforce is a Salesforce Admin
That Admin has permission to approve uninstalled connected apps
Even some Salesforce Admins do not have this permission by default.
Resolution Steps
Step 1: Grant Permission to Approve Uninstalled Connected Apps
Because the GovDash app is not yet installed, Salesforce may hide it unless the Admin has explicit permission.
In Salesforce, go to Setup
Search for Permission Sets
Click New
Name:
Approve Uninstalled AppsClick Save
Open the new Permission Set and go to System Permissions
Click Edit
Enable Approve Uninstalled Connected Apps
Click Save
Click Manage Assignments
Assign this permission set to yourself (the Admin)
Step 2: Trigger the App to Appear in Salesforce
Salesforce will not show the app until it has been “called” at least once.
Log in to GovDash
Make sure you are logged in as the Salesforce Admin who just received the new permission
Click Connect Salesforce
Note:
You may still see an error on this first attempt. That’s expected. This step registers the app in Salesforce so it can be approved.
In many cases, the connection will succeed immediately after this step.
Step 3 (If Needed): Install the App from OAuth Usage
If the connection still fails, or if other users will also need to connect, install the app directly in Salesforce.
In Salesforce, go to Setup
Navigate to Connected Apps OAuth Usage
Find the GovDash app in the list
Click Install
Confirm by clicking Install again
Step 4 (Recommended if performing Step 3): Update App Policies for Ongoing Access
To prevent future connection issues for other users:
In Connected Apps OAuth Usage, find the GovDash app
Click Manage App Policies
Set Permitted Users to:
All users may self-authorize
Under IP Relaxation, select:
Relax IP restrictions
Save your changes
When Are Steps 3 & 4 Required?
If only the Admin is connecting GovDash, Steps 1–2 are often sufficient
If other Salesforce users will:
Connect GovDash
Run syncs
Authenticate the integration themselves
then Steps 3 and 4 are strongly recommended
Still Having Trouble?
If you continue to see OAuth errors after completing these steps, please contact GovDash Support and let us know:
The exact error message
Whether the app appears in Connected Apps OAuth Usage
Whether the connecting user is a Salesforce Admin
We’re happy to help get you connected.
FAQ
What permissions are required to connect GovDash with Salesforce?
You must be both a Salesforce administrator and a GovDash administrator to grant the necessary permissions for the connection.
How can I perform a one-time sync of Salesforce opportunities to GovDash?
You can initiate a one-time sync by clicking the Sync Salesforce Opportunities button and mapping your phases from Salesforce to GovDash.
What happens if the fields between GovDash and Salesforce do not match during a sync?
If the fields do not match, GovDash will display 'null' in the corresponding field in your Pipeline opportunity Overview tab.
Is it possible to automate the syncing of Salesforce opportunities with GovDash?
Yes, you can enable automatic syncing of Salesforce opportunities by selecting the checkbox under the Phases heading after linking your phases.
Can I customize the sync settings for Salesforce opportunities in GovDash?
Yes, you can configure various sync settings, including Create Only Sync and Override Sync, on the Capture Settings page.