Adding from Discover
A major benefit of Discover is the ability to take an opportunity from the search directly to the pipeline, so that your team can start working on capture. To do so, simply click the Add to Pipeline button on any opportunity card. You can also click the same button within an opportunity to move it to the Pipeline as well!
.png)
New to Discover?
Check out our support article here to learn more about utilizing GovDash’s Discover to source opportunities for your Pipeline!
Automatic Opportunity Updates
When opportunities are added from Discover under the Public tab, any updates that are made from the original source (i.e. SAM.gov, PIEE, etc.) for the opportunity are automatically pulled into GovDash. You will receive a notification/email when your opportunities are updated, and what was updated within the opportunity. These updates can include things like response due dates and new documents.
At this time, eBuy updates are not automatically downloaded or applied to opportunities added from the Private tab within Discover to your Pipeline. You must track these changes externally and update your opportunity within your Pipeline manually.
Spreadsheet/Bulk Import
You can upload a list of opportunities to the Pipeline by clicking the + Opportunity button in the top right of the Pipeline, and choosing Bulk upload opportunities from the options provided.
.png "image(30).png")
On the following page, either drag and drop your file into the box, or click the upload box as shown below to select your file.
GovDash provides an easy to use template that will download an Excel spreadsheet that automatically has your team’s fields (both GovDash provided and custom fields) mapped to the column headers.
Next, set your opportunity classification. All opportunities within the import must share the same classification, but this can be changed individually after import by selecting the classification next to the opportunity’s title.
.png)
Editing Opportunity Classification
.png)
Bulk Import Process
Map your file's columns using the drop down menus. If you are missing a field within GovDash, you can quickly create a custom field from the import screen, as shown below. Once all fields are mapped, click the Next button at the top to continue.
.png)
Field Mapping and Custom Field Creation
GovDash will detect the number of opportunities within your spreadsheet and allow you to choose which ones you'd like to add, or you can add all opportunities by clicking . Once you're finished selecting your opportunities, click the Add To Pipeline button at the top to finish your import.
Manually Adding an Individual Opportunity
You can also manually create opportunities in the pipeline by clicking the + Opportunity button in the top right, and then the Add an individual opportunity button in the pop up menu of options.
.png)
Next, fill in the relevant opportunity details that GovDash provides, your opportunity classification, your custom field data, and once you’re finished, click Next. GovDash will ask you to preview the opportunity, which you can then click Confirm & Add to Pipeline to finish.
Optionally, you may upload documents to opportunities added in this way during the final step, but documents can be added at any time to any of your opportunities you create from the Documents tab within the opportunity.
Mandatory Fields
You may optionally customize which fields are mandatory for creating individual opportunities within the Capture Settings in GovDash. Check out our support article here to learn more!
Setting and Managing Opportunity Classifications
When you upload a document into GovDash, you will select its classification as either (U) Unclassified or (CUI) Controlled Unclassified Information. This classification helps your team properly label sensitive data and ensures it is protected on the GovDash platform.
.png)
How Classification Works in GovDash
GovDash uses your document classification to automatically label related information across the platform.
If a document is classified as CUI, GovDash will automatically propagate that classification to items that are derived from that document or created from it. Examples include:
If you upload a CUI focus document to a proposal, the proposal classification will be updated to CUI
If you upload a resume and mark it as CUI, the Key Personnel entity extracted from that resume will also be marked as CUI
This same behavior applies across other connected parts of GovDash as information is extracted and structured from your uploaded files.
.png)
Where You Can Set Classification
Classification is not limited to document uploads. Other areas of GovDash also allow you to set classification, such as when you are creating an opportunity.
GovDash supports classification on the following types of records:
Dash Conversations
Key Personnel
Government officers (rarely used in the UI)
Agencies
Business partners
Capabilities
Forms (such as data calls)
Custom documents
Documents
Awards
Proposals
Opportunities
Updating Classification After Upload
If you need to change a classification after something is already in GovDash, you can update it at any time.
.png)
When you update the classification of a “parent” item (like a document), GovDash will show a popup listing related items that were derived from it. This helps you quickly decide whether you also want to update the classification of those related records.
.png)
Important Note Regarding Classification
Your team is responsible for properly marking your data in GovDash. Correct classification ensures that sensitive information is handled appropriately and that properly labeled, sensitive data is protected on the GovDash platform.
Merging Opportunities
Prefer a video walkthrough? Watch how to merge opportunities in GovDash here
Over time, the same pursuit can end up in your pipeline multiple times. This might happen from a Discover notice, once from a bulk import or a manual entry, or as a pre-solicitation that later reappears as a full RFP. Merging Opportunities lets you combine two of those records into one, so your team works from a single source of truth without losing any of the work that already lives on either record.
When you merge, GovDash walks you through a short, guided merge editor where you decide what to keep from each opportunity: field values, linked sources, documents, team members and government contacts, and capture work like capture questions, capability matrices, pricing, teaming, and data calls. One opportunity is kept and updated with your choices; the other is permanently removed.
Before You Merge
You need edit access to both opportunities. If you can't edit one of them, the merge will not go through.
Merges work on exactly two opportunities at a time. To combine more than two records, run the merge again with the result and the next duplicate.
The opportunity that is removed is deleted permanently. Its retained information is carried over to the opportunity you keep, but the record itself cannot be restored. Review each step of the merge editor before you confirm.
Starting a Merge
There are two ways to open the merge editor: From the pipeline bulk-edit bar or from an opportunity’s action menu.
From the Pipeline Bulk-Edit Bar
Click Pipeline in the left-hand navigation menu and switch to the table view if you're not already there.
Tick the checkbox next to each of the two opportunities you want to combine. The bulk-edit bar appears at the bottom of the table.
Click the Merge opportunity icon in the bulk-edit bar (hover over it to see the tooltip). The button stays disabled until exactly two opportunities are selected — if you have one or three or more selected, the tooltip tells you to adjust your selection.
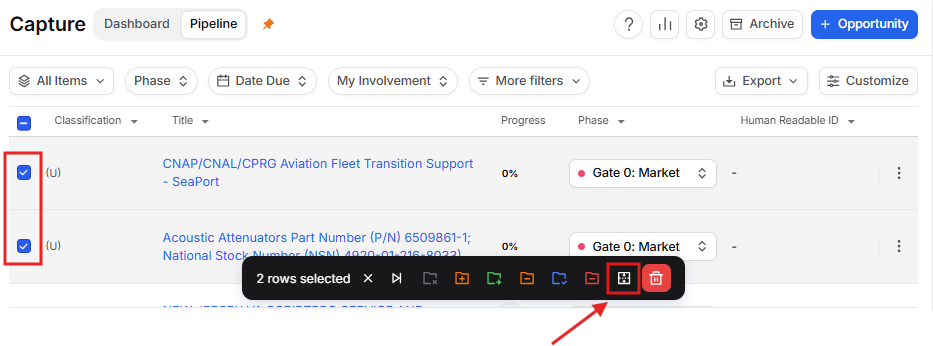 The first opportunity you selected is the one that will be kept; the second is the one that will be merged into it. You can confirm which is which at the top of the comparison tables in the merge editor.
From an Opportunity’s Action Menu
In the Pipeline, click the ⋯ (action) menu on the opportunity you want to keep.
Select Merge opportunity.
In the Select related opportunity to merge dialog, search for the opportunity you want to merge in, tick it, and click Merge. Opportunities you've already linked as related on the Sources tab are excluded from this list.
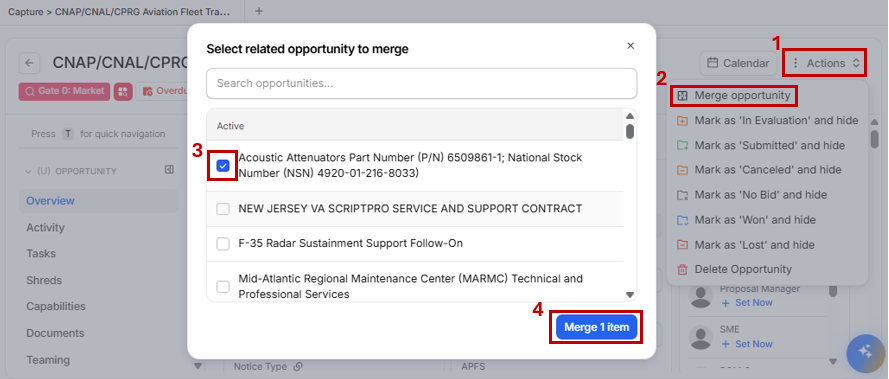
Using the Merge Editor
The merge editor is a six-step pop-up box. Use Continue and Back to move between steps, or click a step name at the top to jump straight to it. Each step shows the two opportunities side by side so you can compare what's on each record before you choose.
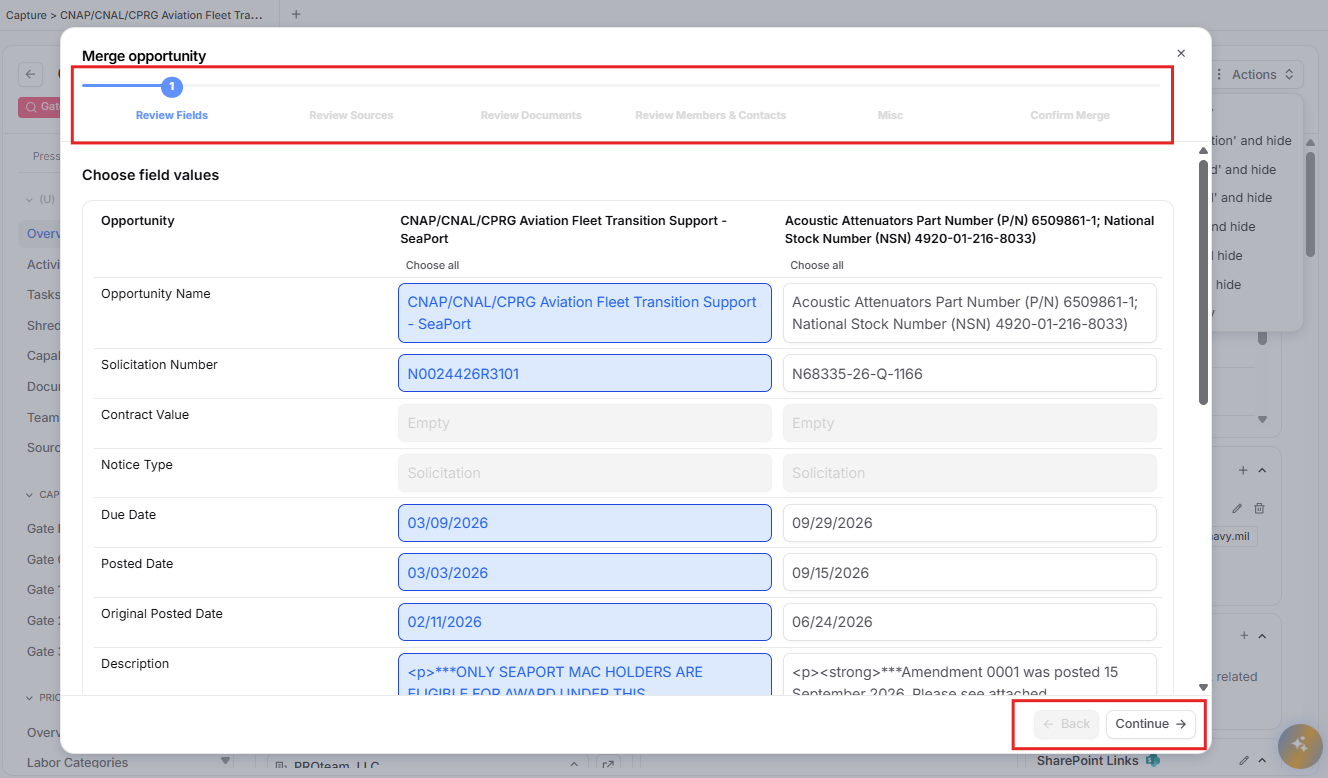
Review Fields: Under Choose field values, every standard field (such as name, agency, submission stage, dates, and value) is listed with the value from each opportunity. Where the values differ, pick the one you want to keep; by default the kept opportunity's value is selected. Fields that already match are shown for reference and don't need a decision. Any Custom fields on your workspace appear below with the same side-by-side choice.
Review Sources: The Sources step lists every linked source (Discover notices, GovWin records, manual links) from both opportunities. Tick the sources you want to carry over and choose which one should be the Primary source on the merged opportunity.
Review Documents: The Documents table lists the solicitation documents attached to each opportunity along with their type. Everything is kept by default, untick any document you don't want carried over. If GovDash detects that a document on the merged-in opportunity is the same file as one on the kept opportunity, it is flagged with a Duplicate of badge so you can skip it.
Review Members & Contacts: Under Members, each capture team role is shown with the person assigned on each opportunity; where they differ, choose who should hold the role after the merge. Under Government contacts, tick the contacts you want to keep on the merged opportunity.
Misc: The Misc step covers capture work that can only live on one record: Capture (capture questions and capability matrix), Pricer (pricing workbooks and projections), and Teaming & data calls. For each area, choose which opportunity's work to retain. Areas where the two opportunities don't conflict are shown for reference and don't need a decision.
Confirm Merge: The final step asks you to confirm before anything changes:
Optionally set the security classification for the merged opportunity using the classification dropdown.
Read the Warning — it names the opportunity that will be permanently deleted — and tick I agree.
Click Merge.
If you close the editor before confirming, GovDash asks whether you want to Keep editing or Close editor. Closing the editor discards your merge selections.
After the Merge
The kept opportunity is updated with the field values, sources, documents, members, contacts, and capture work you selected, and the merged-in opportunity is removed from your pipeline.
Comments from the merged-in opportunity are carried over to the kept opportunity.
If you started from the bulk-edit bar, your selection clears and the table refreshes in place. If you started from an opportunity's action menu, GovDash takes you to the merged opportunity.
FAQ
What are the methods to add opportunities to the pipeline?
You can add opportunities through Discover, by importing a spreadsheet, or by manually adding them.
How can I add an opportunity from Discover?
Click the Add button on any opportunity card or within the opportunity itself to move it to the Pipeline.
Is it possible to upload opportunities in bulk?
Yes, you can upload a list of opportunities by clicking the + Opportunity button and selecting Bulk upload.
Can I import my GovWin pipeline into GovDash?
Yes, you can import your GovWin pipeline by exporting it and following the bulk import steps.
How do I manually add an opportunity?
Click the + Opportunity button, select Add an individual opportunity, fill in the details, and confirm to add it to the pipeline.
Can I merge more than two opportunities at once?
Not in a single pass. Select exactly two opportunities, complete the merge, then repeat with the result and the next duplicate.
Can I undo a merge?
No. The merged-in opportunity is permanently deleted when you click Merge, which is why the final step asks you to confirm. Review each step carefully before confirming.
Which opportunity is kept?
When you start from the bulk-edit bar, the first opportunity you ticked is kept. When you start from an opportunity's action menu, that opportunity is kept and the one you pick in the selector is merged into it.