Max Tier Feature
GovDash Pricer is a Max tier feature, but includes one free usage every rolling 30 days. Please reach out to your Account Manager or email support@govdash.com to subscribe or get more information.
The ODCs & Materials tab is where you manage non-labor costs in GovDash Pricer, including materials, travel, subcontracts, equipment, and any other direct costs that aren't captured as labor. Items entered here are assigned to work packages and roll directly into the Basis of Estimate.
Although the tab is named ODCs & Materials, the broader concept is non-labor direct cost. Materials are technically a category of ODC; the category badge on each row distinguishes the type (ODC, Materials, Travel, Subcontract, or Other) so totals can be summarized appropriately. The tab is the single place to maintain unit prices, quantities, CLIN assignments, and work package links for every non-labor cost in the estimate.
What You Use This Tab For
Use the ODCs & Materials tab to:
Review non-labor cost items extracted or auto-populated from your WBS
Add items manually for costs that weren't captured automatically
Enter unit prices and quantities for each item
Assign items to one or more work packages
Set CLIN numbers to connect items to contract line items
Navigate directly to related items in the WBS and BOE tabs
How Items Get Onto This Tab
There are multiple paths an item can take to appear here, and it's useful to understand them because they behave the same once added but tell you different things about how the cost was identified.
Extraction from the Solicitation
Pricer reads the full solicitation package and extracts non-labor cost items that are explicitly called out in the documents. "Explicit" is the key word: Pricer does not assume a cost is needed just because the work might typically require it. If the solicitation never mentions a particular piece of equipment, that equipment will not be extracted as an ODC. This conservative approach keeps the extracted list defensible against the source documents and prevents the estimate from being inflated by assumed costs.
Auto-population from Work Package AQL
There is one narrow exception to the explicit-mention rule. When a work package has an Acceptable Quality Level that implies a specific tool, material, or service is required to meet it, Pricer may infer the corresponding ODC and add it automatically. For example, if a grounds maintenance contract specifies an AQL that grass must be maintained between two and three inches, Pricer can infer that a mower is needed to achieve that quality level.
This kind of inference is rare in practice and happens only when the AQL language is specific enough to justify it. Most ODCs come straight from explicit solicitation language.
Manual Entry
You can always add items yourself for costs the solicitation didn't capture (or that came from internal knowledge of how your team executes similar work). Manually added items carry a Manual badge in the table so you can distinguish them from extracted items at a glance.
Why Some Items Look Like Duplicates
You'll occasionally see what appear to be duplicate items in the table, two travel line items with slightly different descriptions, for instance. Pricer keeps non-labor items separate when they were extracted from different work packages, even when the items look similar, so the cost stays traceable back to the specific scope that called for it.
If one work package calls for CONUS travel for a kickoff meeting and another calls for CONUS travel for quarterly reviews, those will appear as two items rather than one rolled-up travel line. This is intentional: each item retains a clear link to its source, which makes the cost build easier to defend during review. If you want to consolidate, you can manually remove the redundant items and reassign the consolidated one to multiple work packages.
Categories
Every item belongs to exactly one category, which is set at creation and cannot be changed afterward. If a category needs to change, delete the item and recreate it. The table is sorted first by category, then alphabetically by item name within each group. A section-separator row visually labels each category group.
Category | Badge color | When to use |
|---|---|---|
ODC | Blue | Other direct costs. A catch-all for direct non-labor items not covered by a more specific category. |
Materials | Green | Physical goods, hardware, consumables, or supplies required for contract performance. |
Travel | Yellow | Travel, per diem, lodging, and transportation costs. |
Subcontract | Indigo | Amounts paid to subcontractors or teaming partners. |
Other | Gray | Items that don't fit any other category. |
The Items Table
The items table is the working surface of the tab. Every non-labor cost in the estimate appears here as a row, and the columns capture the pricing data that rolls into the Basis of Estimate: unit price, work package assignments, CLIN, and the totals computed from them.
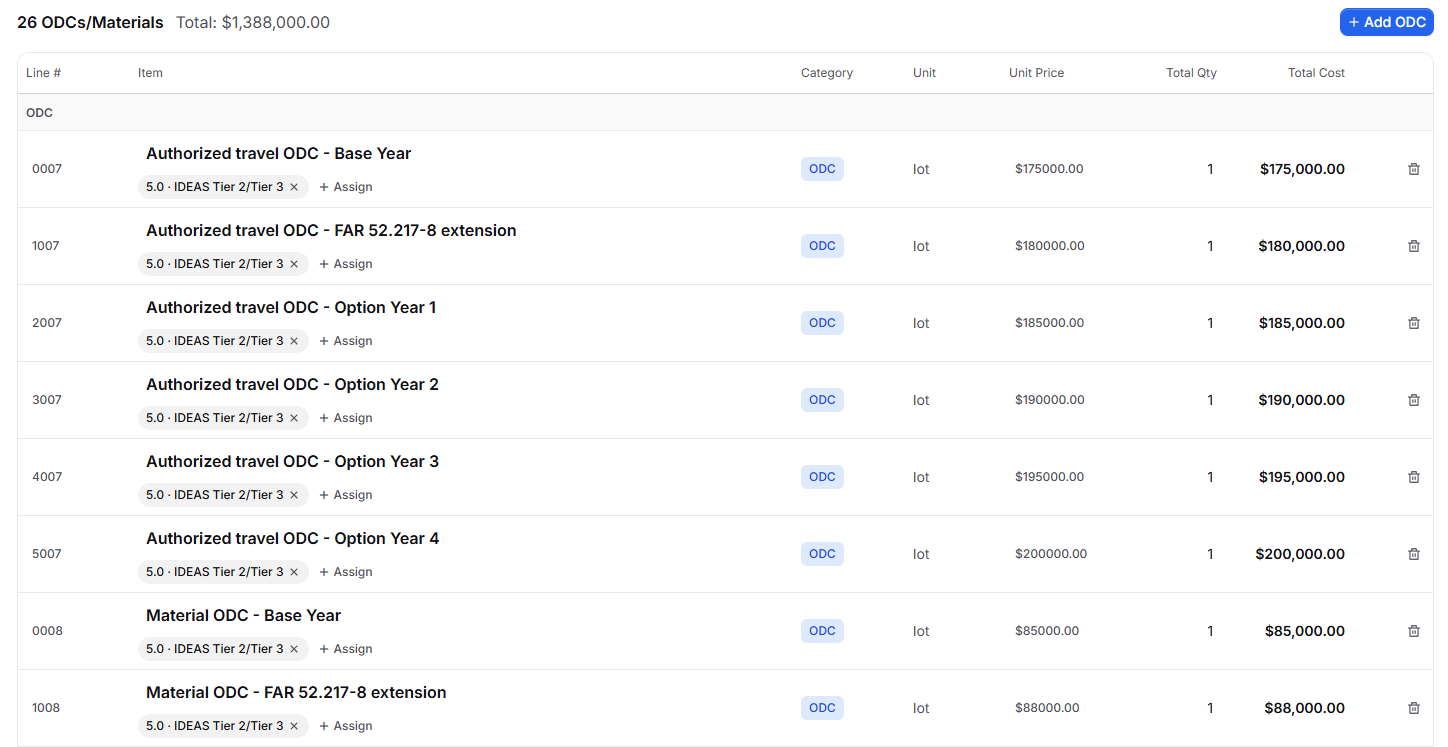
Line # — The CLIN associated with this cost item. Click to edit; shows "Set CLIN" as a placeholder when blank. Setting a CLIN here ties the item to a specific contract line item, which is useful when the proposal pricing format groups non-labor costs by CLIN.
Item — The primary cell for identifying the item and managing its work package links. Contains the item name in bold (click to edit inline) and a Manual badge for items you added by hand. Pill badges for each work package assignment appear below the name, showing the WBS number and quantity. Use the remove control on any pill to drop that assignment, or the Assign button to link new work packages.
Category — The cost type: ODC, Materials, Travel, Subcontract, or Other. Drives the badge color and the section grouping in the table. Set at creation and not editable from the row; to change a category, delete the item and recreate it.
Unit — The unit of measure for the item ("each," "license," "month," "trip"). Combines with Total Qty and Unit Price to produce the per-item total. Fixed at creation alongside category. Set it thoughtfully, since changing it later requires recreating the row.
Unit Price — The per-unit dollar cost. This is where the actual pricing for a non-labor item happens; once set, it multiplies against Total Qty to produce Total Cost. Click to edit, prefixed with a dollar sign. Clearing the field removes the price and Total Cost reverts to a placeholder.
Total Qty — The live sum of quantities across all work package assignments. Clicking the cell opens the Assign to Work Package dialog so you can add another assignment, and the total updates as soon as that assignment is saved. See "How Quantity Works" below for why the value flows through assignments rather than being edited directly.
Total Cost — The total dollar cost for the item: Unit Price multiplied by Total Qty. Contributes to the page header total and feeds the BOE rollup for every work package the item is assigned to. Shows a placeholder when no unit price is set.
Trash icon — Removes the item and all of its work package assignments. A confirmation dialog appears first since this can't be undone. Use this when an extracted item was identified in error, when multiple items have been consolidated into one, or when the cost no longer applies to the estimate.
How Quantity Works
Quantity in this tab is anchored at the work package assignment, not at the item itself. The Total Qty column is a computed sum, not an editable field. This is a deliberate design choice that takes a moment to internalize but pays off in cost defensibility.
Every unit of every non-labor cost is tied to a specific work package. If you need ten units of an item, you don't increment a quantity counter on the item itself, you assign the item to one or more work packages with quantities that sum to ten. That might be a single assignment for ten units, or two assignments for five units each on different work packages, or any other split that reflects where the cost actually applies.
Pricer enforces this anchoring because cost without a scope link is hard to defend. A floating quantity with no work package attached has no narrative behind it, which makes it harder to explain to a reviewer (or to your own pricing review) and easier for a cost realism analysis to challenge. Keeping every unit attached to a work package keeps the cost build transparent end to end.
Workflow Tips
To increase the quantity of an item: open the Assign dialog from the item row, pick a work package (a new one or one already linked), and enter the additional quantity for that assignment. The Total Qty column updates automatically once the new assignment is saved.
Dialogs
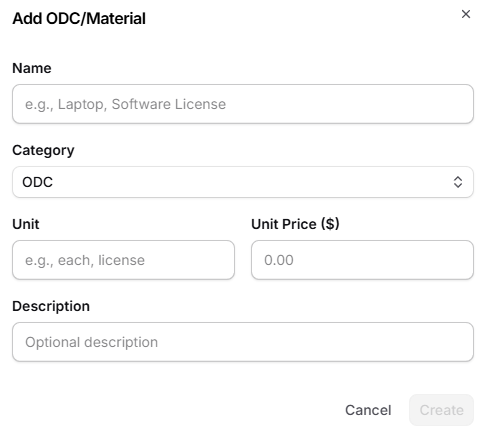
Add ODC / Material
Opened from the Add ODC button in the page header or the Add manually button in the empty state.
Name (required) — The item name. The Create button remains disabled until this field is populated.
Category (required) — One of ODC, Materials, Travel, Subcontract, or Other. Defaults to ODC. Choose deliberately, since the category cannot be changed later.
Unit (optional) — The unit of measure (for example, "each," "license," "month," or "trip"). Also fixed at creation, so set it before saving.
Unit Price (optional) — The per-unit dollar cost. Can be set later in the table.
Description (optional) — Stored narrative text not displayed in table columns but useful for internal notes about the item's purpose or sourcing.
Assign to Work Package
Opened from the Assign button on any item row to link the cost to one or more WBS nodes. Every item must be assigned to at least one work package for its cost to show up in the Basis of Estimate.
Work Package (required) — Opens the Work Package Picker to select from your WBS nodes.
Quantity — The number of units for this assignment. Defaults to 1. Multiple assignments for the same item accumulate into the Total Qty shown on the row.
Notes (optional) — Internal notes specific to this assignment, useful when the same item lands on several work packages for different reasons.
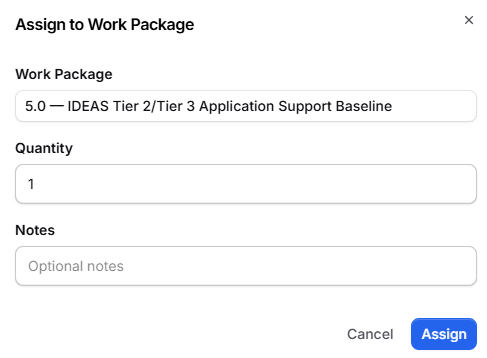
One item can be assigned to multiple work packages, with each assignment tracking its own quantity and notes independently. This is how you handle costs that span the contract: define the item once, assign it everywhere it applies, and let the quantities roll up.
A Typical Workflow
Most teams settle into a rhythm that runs through the tab top to bottom:
Review extracted items first. Confirm that what Pricer pulled from the solicitation looks right. Watch for items that should be consolidated or that ended up in the wrong category.
Add anything missing. Use the Add ODC button for items your team knows are needed but the solicitation didn't explicitly call out (for example, a software license your team always uses on this kind of work).
Set unit prices. Enter the per-unit cost for each item. Items without a price show "—" in Total Cost and don't contribute to the header total.
Assign to work packages. For each item, use the Assign button to link it to the work packages where the cost applies, with the quantity for each. Items that came in via extraction or auto-population may already have assignments; verify they're correct and add more if needed.
Verify totals. The page header shows the running total of priced items. Use it as a sanity check against the non-labor budget for the opportunity.
Navigation
Several areas of the application deep-link directly to a specific item on this tab, automatically scrolling to and briefly highlighting that row:
Clicking an item row in the ODCs / Materials card on the Overview tab
Clicking an ODC or material item in the Cost Elements section of a WBS node
Clicking a Catalog row in the Basis of Estimate tab
How This Tab Connects to the Rest of Pricer
Items added here are assigned to work packages, which makes them visible in the Cost Elements section of the WBS tab and rolls their cost into the Basis of Estimate for those nodes.
When an item is linked to a WBS node, it appears as a Catalog row in the non-labor section of the BOE tab for that node. Edits to unit prices on this tab flow automatically to every BOE Catalog row referencing the item, so this tab is the single source of truth for non-labor cost data. There's no need to re-enter the same price across multiple work packages.
The Overview tab provides a category count and total cost summary as a quick sanity check. Corrections to those high-level figures are performed here, since this tab is where the underlying records live.