Max Tier Feature
GovDash Pricer is a Max tier feature, but includes one free usage every rolling 30 days. Please reach out to your Account Manager or email support@govdash.com to subscribe or get more information.
The Basis of Estimate tab is the central hub for the cost estimate in GovDash Pricer. It presents labor hours and non-labor costs by work package, giving you a structured line-item view that connects the WBS hierarchy to actual contract dollars.
The BOE complements the WBS tab; the two tabs serve different purposes in the pricing workflow. The WBS tab is where you confirm the structure of the work and the elements of cost that apply to each node: which labor categories, which ODCs, which materials. The Basis of Estimate tab is where you finalize the pricing for each work package, see the rollups, and lock in cost entry as ready. In practice you'll move between the two tabs as you refine an estimate, but the mental model holds: WBS for scope and elements, BOE for dollars.
Most of what appears on this tab is driven by other tabs. The WBS provides the header structure, the Labor Categories tab feeds linked labor rows, and the ODCs & Materials tab feeds Catalog rows. The BOE tab is where everything converges, where you can mark readiness, add ad-hoc rows, and export the completed grid.
What You Use This Tab For
Use the Basis of Estimate tab to:
Review all cost rows organized by work package
Enter hours directly on labor rows that aren't linked to the Labor Categories tab
Mark work packages as ready for cost entry
Add manual labor and non-labor rows to any work package
Pull in ODC and material items from your catalog without re-entering them
Export the full BOE grid as a spreadsheet
Tab-Level Actions
The Export button downloads the entire BOE grid as a spreadsheet. Every visible row, including WBS headers, category separators, labor rows, and non-labor rows, is included in the export. This is the typical handoff format for proposal pricing packages, internal cost reviews, or color teams that want to see the cost build in a familiar format.
Readiness Alerts
A yellow warning banner appears at the top of the tab when some or all work packages have not been marked ready. These banners are reminders only; you can still view and edit rows regardless of readiness state. Readiness is a workflow marker, not a lock, it signals that you've finished pricing a work package and considered it complete.

Bulk Selection
Each WBS header row has a checkbox. When one or more are checked, an action bar appears at the top of the grid with the following controls:
Mark as Ready — Sets all selected work packages to ready in one action. Use this when you've reviewed several work packages together (for example, after a pricing review meeting).
Mark as Not Ready — Clears the ready status from all selected work packages. Useful when an upstream change requires re-review.
Clear Selection — Unchecks everything and dismisses the bar.

The BOE Grid
The BOE grid is the working surface of the tab. This is where every cost in the estimate comes together, organized by work package: WBS nodes become collapsible header rows, with labor and non-labor cost rows nested underneath. The depth of the grid mirrors the depth of your WBS, so structures that go beyond two levels show that hierarchy here too. Click any header to expand or collapse its rows.
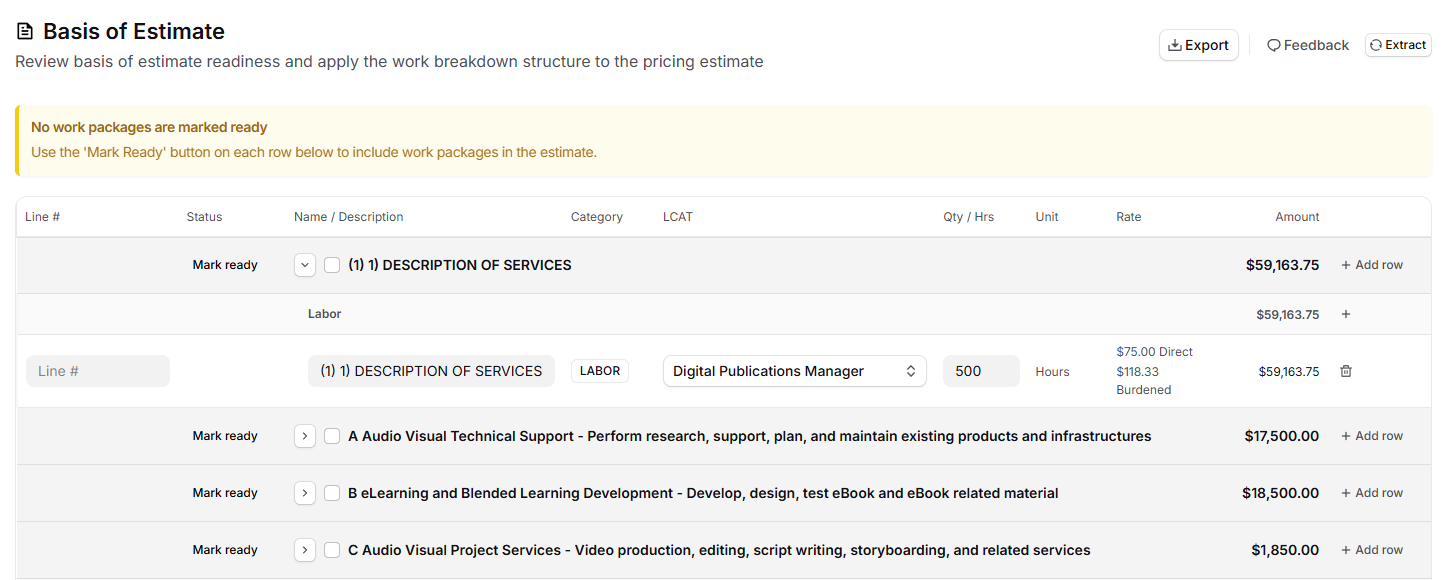
WBS Header Rows
Each work package gets one header row. The header anchors all the cost rows nested under it and serves as the control surface for work-package-level actions: marking readiness, bulk selection, and adding new cost rows.
Checkbox — Selects the work package for bulk readiness operations from the blue action bar (see Bulk Selection above).
WBS number and title — Identifies the work package by the structure built in the WBS tab. Changes to WBS numbering or titles flow here automatically.
Amount — The live cost rollup for everything nested under this work package.
Ready badge or Mark ready link — Marks the work package as priced and reviewed. Click to toggle. The yellow readiness banner at the top of the tab updates as you flip these on across the grid.
Add row dropdown — Adds a labor, non-labor, or catalog-linked row to this work package. See "Adding Rows" below.
The Amount rollup sums every labor row and non-labor row underneath that work package, including catalog and manual rows alike. The grand total at the bottom of the grid sums the header rows. Edits to any line item, whether adjusting hours on a labor row or changing a unit price on a catalog row, reflect immediately in both the header total for that work package and the grand total.
Labor Rows
Labor rows show every labor category assignment under a work package. They come in two flavors, and the distinction tells you where to make edits:
Linked rows come from labor category assignments made in the Labor Categories tab. The hours, LCAT, and description on these rows are managed from that tab, so edits to those fields belong there. Clicking a linked labor row navigates to the Labor Categories tab and highlights the matching assignment with a blue ring.
Manual rows are added directly in the BOE tab using the Add row dropdown. These rows have editable Line #, Description, LCAT dropdown, and Hours fields, along with a delete button. Use manual rows for one-off labor that doesn't justify creating a full labor category, or for placeholder rows during early-stage pricing.
SLIN badges identify rows that represent sublines within a CLIN, used when a contract requires pricing visibility into individual elements of a line item. A blue SLIN badge marks a separately-priced subline that contributes to the total. A gray SLIN · NSP badge marks an informational subline (Not Separately Priced); its Qty, Rate, and Amount cells show "NSP" and are not editable, since the cost is captured at the parent CLIN level.

The Rate column shows the direct and burdened rate pulled from the labor category. Rates are read-only here because they're managed in the Labor Categories tab; changes there flow back to every row using that category.
Non-Labor Rows
Non-labor rows show every ODC, material, travel, subcontract, or other item assigned to a work package. They come in two flavors, and like labor rows, the distinction tells you where to make edits:
Catalog rows are synced from items set up in the ODCs & Materials tab and assigned to this work package. They show a gray Catalog badge instead of a delete button. Description, Qty, Unit, and Unit Price are editable, and changes flow back to the catalog item automatically. This is by design: when you set up a software license once with a unit price, you shouldn't have to re-enter it on every work package that uses it. Clicking a Catalog row navigates to the ODCs & Materials tab and highlights that item.
Manual rows are added directly in the BOE tab. They have a full set of editable fields and a delete button. Use them for non-labor costs that exist on a single work package and don't need to be tracked as a catalog item.

Adding Rows
Every WBS header row and category separator row has an Add row button. Clicking it opens a dropdown menu with three groups of options, organized by where the new row's data should come from:
Labor — One entry per defined labor category in your estimate, plus an "Unassigned labor row" option. Selecting a labor category creates a new row pre-assigned to that role, which is the fastest way to add labor that you'll continue to manage from the Labor Categories tab.
Non-labor — Options to add an ODC row, Materials row, Travel row, or Other row. Each creates a manual non-labor row with the corresponding category.
From catalog — If any items exist in the ODCs & Materials tab, they appear here. Selecting one creates a Catalog-linked row for that item without re-entering the details, which keeps the unit price in sync with the catalog if it changes later.
Note
Adding a row to a work package that has no WBS item number shows an error toast. Assign a number to the node in the WBS tab first.
A Typical Workflow
BOE work usually happens after the WBS, Labor Categories, and ODCs & Materials tabs are roughly in shape. A common sequence:
Expand a work package. Click the header to reveal its labor and non-labor rows. Confirm the right elements of cost are present.
Adjust where needed. For linked rows, jump back to the source tab to make changes. For manual rows, edit them inline. Add new rows from the Add row dropdown if something is missing.
Check the rollup. The Amount column on the header row shows the total cost for that work package. Use it as a sanity check against any budget you have for that scope.
Mark as Ready. When the work package is priced and reviewed, toggle Ready on the header row. The yellow readiness banner at the top of the tab updates as you go.
Export when complete. Once all work packages are ready, the Export button produces the full BOE grid as a spreadsheet for proposal submission or internal handoff.
How This Tab Connects to the Rest of Pricer
The BOE grid is the convergence point for everything you've built in the other tabs. WBS structure determines which header rows appear. Labor categories and their rates feed into labor rows. ODC and material items assigned in the ODCs & Materials tab appear as Catalog rows automatically. Indirect rates configured in the Indirect Rates tab drive the burdened rates shown on labor rows.
Clicking any labor row with an LCAT navigates to the Labor Categories tab with that assignment highlighted. Clicking any Catalog row navigates to the ODCs & Materials tab with that item highlighted.
Navigation also works in the other direction. The Overview, WBS, and Labor Categories tabs all deep-link into specific rows on this tab, scrolling to and briefly highlighting the target row so you can pick up where you left off after switching context.