Overview
The GovDash Data Library is your central document repository for documents like capability statements, resumes, technical documentation, and more. It provides categorization tools such as tags, key personnel profiles, company and agency databases. SharePoint is easily integrated, which will allow you to sync your SharePoint documents within GovDash.
Data Library Document Recommendations
Unsure what to upload to the GovDash Data Library? Check out our recommended document list below. These aren’t required documents, but they can help GovDash understand more about your business, capabilities, certifications, and more.
Company Overview/ Mission Statement
Key Personnel Bio’s
Resumes
Narratives/boilerplate that are often requested in RFPs such as:
Management Approach
Staffing Plan
Approach to Sustainability
Risk Management Plan
Quality Assurance Practices
Writeups on your Key Service Offerings (What you would have listed as services on your company website)
Legal & Contractual Compliance Documents
Intellectual Property & Data Rights (Handling of proprietary information)
Security & Compliance Certifications (Cybersecurity requirements such as CMMC, NIST 800-171, etc.)
Insurance & Liability Coverage (Proof of required coverage (e.g., general liability, workers’ comp, etc.)
Uploading Documents
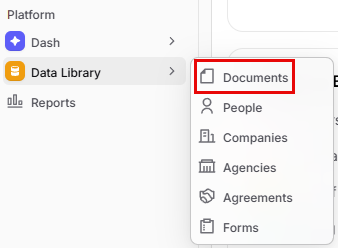
To start uploading your team documents to the Data Library, hover the Data Library button on the left hand side of GovDash and select Documents.
Click the Upload Files button displayed in the top right hand corner to begin uploading.

Next, begin uploading your files. Once your documents have been uploaded, they will display in the list. You can also choose files from SharePoint or Google Drive using the SharePoint and Google Drive tabs.
SharePoint Integration
For more information and a tutorial on our SharePoint integration, check out our guide here!
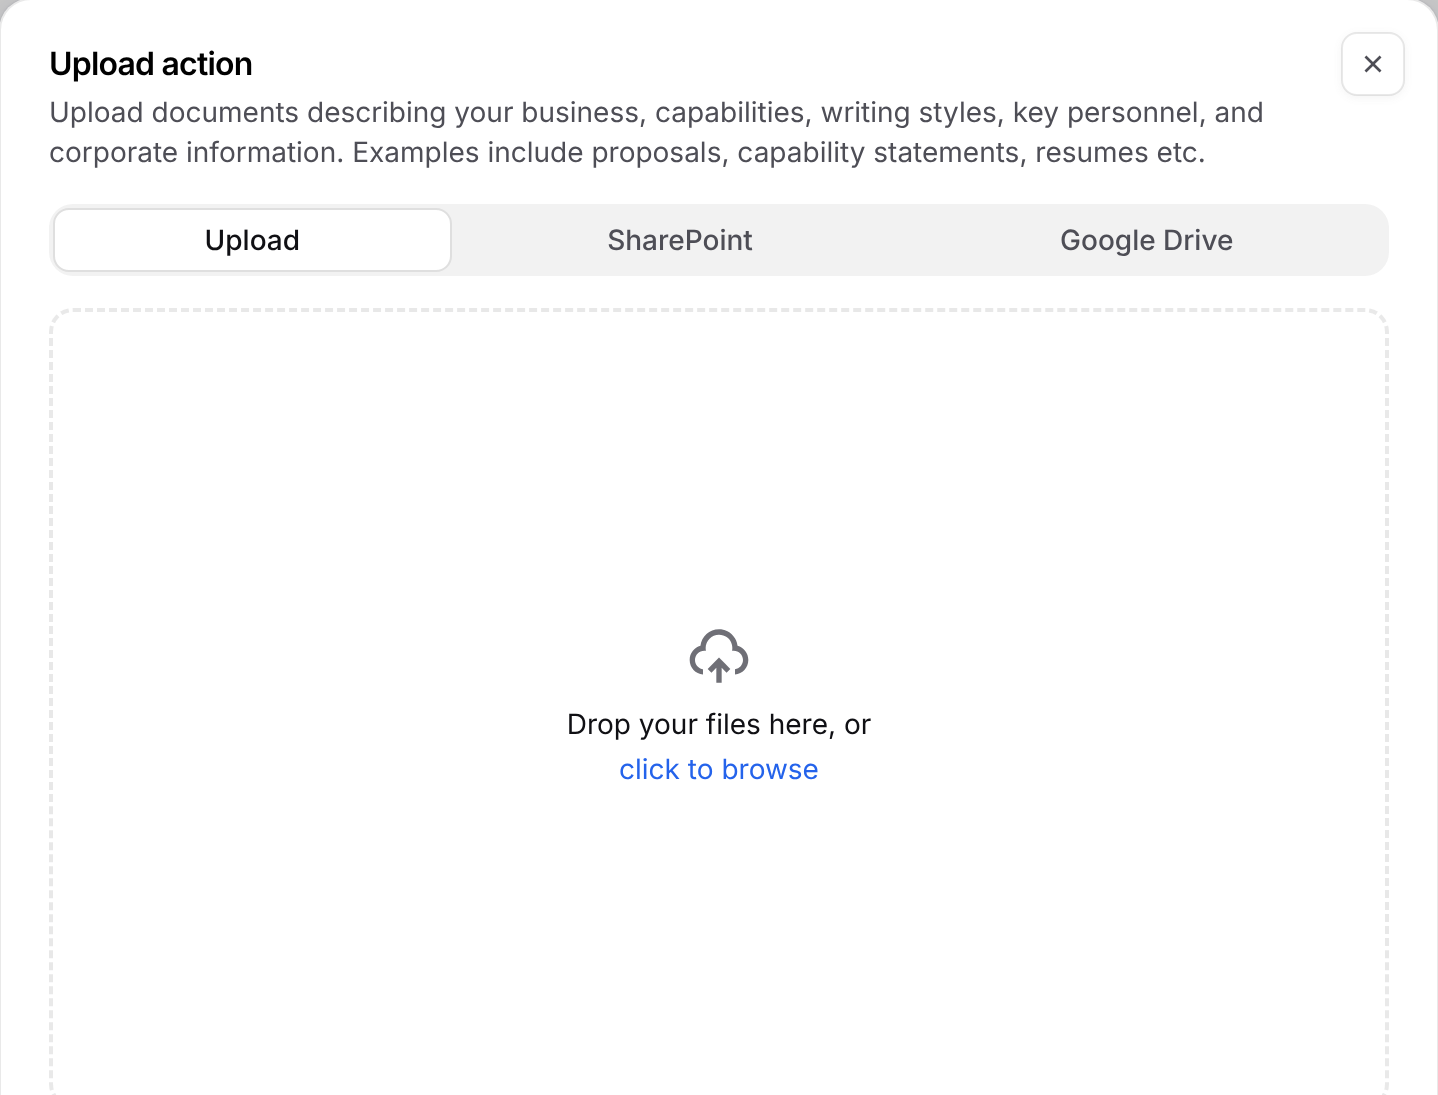
Click Confirm at the bottom once you’ve finished selecting your files.
Setting and Managing Document Classifications
When you upload a document into GovDash, you will select its classification as either (U) Unclassified or (CUI) Controlled Unclassified Information. This classification helps your team properly label sensitive data and ensures it is protected on the GovDash platform.

How Classification Works in GovDash
GovDash uses your document classification to automatically label related information across the platform.
If a document is classified as CUI, GovDash will automatically propagate that classification to items that are derived from that document or created from it. Examples include:
If you upload a CUI focus document to a proposal, the proposal classification will be updated to CUI
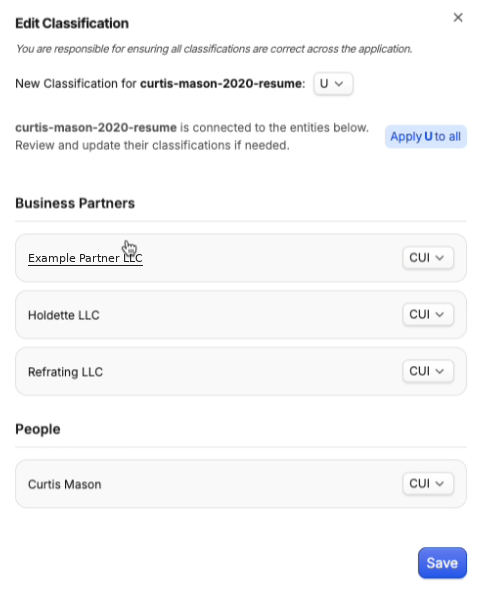
If you upload a resume and mark it as CUI, the Key Personnel entity extracted from that resume will also be marked as CUI
This same behavior applies across other connected parts of GovDash as information is extracted and structured from your uploaded files.

Where You Can Set Classification
Classification is not limited to document uploads. Other areas of GovDash also allow you to set classification, such as when you are creating an opportunity.
GovDash supports classification on the following types of records:
Dash Conversations
Key Personnel
Government officers (rarely used in the UI)
Agencies
Business partners
Capabilities
Forms (such as data calls)
Custom documents
Documents
Awards
Proposals
Opportunities
Updating Classification After Upload
If you need to change a classification after something is already in GovDash, you can update it at any time.

When you update the classification of a “parent” item (like a document), GovDash will show a popup listing related items that were derived from it. This helps you quickly decide whether you also want to update the classification of those related records. Changing classifications in bulk works a little differently. See Changing Classifications in Bulk below.
Changing Classifications in Bulk
Need to reclassify a large batch of files, like a set of resumes? You can change the classification of multiple records at once from the Documents, People, Companies, and Agencies tabs of the Data Library.
Hover the Data Library button in the left-hand navigation menu and select Documents (or open the People, Companies, or Agencies tab).
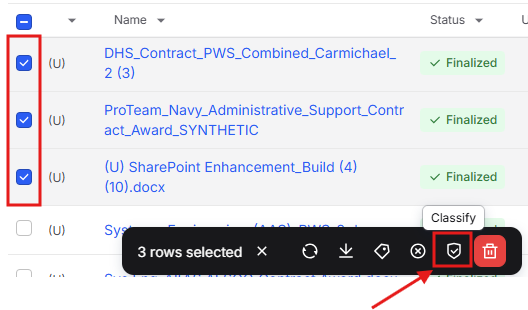
Use the checkboxes beside each row to select the records you'd like to reclassify. A black action bar will appear at the bottom of your screen.
Click the shield icon (Classify) in the black action bar.
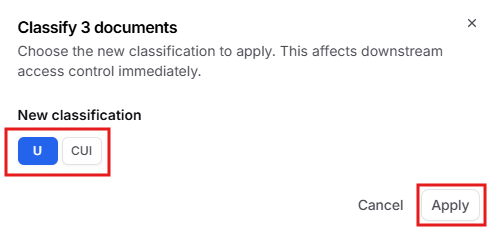
In the Classify window (for example, Classify 3 documents), choose the new classification under New classification: U (Unclassified) or CUI (Controlled Unclassified Information).
Click Apply. GovDash will confirm the change (for example, "Classified 3 documents"), and the new classification takes effect right away.
Important Note Regarding Classification
Your team is responsible for properly marking your data in GovDash. Correct classification ensures that sensitive information is handled appropriately and that properly labeled, sensitive data is protected on the GovDash platform.
File Formats
GovDash supports a wide range of file formats for uploading your data and documents. You can confidently upload common file types such as PDF (.pdf), Word documents (.doc, .docx), Excel spreadsheets (.xls, .xlsx), CSV files (.csv), and more.
Whether your file is a PDF or a Word document, GovDash treats both formats equivalently for document handling and processing. There’s no need to convert between file types, simply upload what you have, and we’ll take care of the rest.
For PowerPoint (.ppt, .pptx) file formats, we will extract text from slides, but will not process images.
For image file formats (.png, .jpeg, .tif, etc.) we are able to extract clear text, but not utilize any of the actual image.
If you have questions about a specific file format or run into issues uploading, please contact our support team.
Data Library Dashboard
The Data Library Dashboard provides you with a birds eye view of your entire file repository within GovDash. At a glance, you will find insights like recent documents, file tag breakdowns, staffing pool insights, contract award compliance, type breakdown, and more.
Each insight has interactable visuals that will take you straight to the data source, pre-filtered for your convenience.

Document Details/Relationship Viewer
By selecting a document’s name within your Data Library, you can get deep insights into your specific document and its use within GovDash. From this view, you can:
Rename your document.
Add/remove tags.
View the relationships the document has within GovDash (contracts, proposals, opportunities, people, and more).
Review document history changes, such as documents being renamed.
Ask Dash to summarize the document for you, and ask follow up questions about the document.
Review the document in the document viewer pane.
Open/Download the document.

Renaming and Deleting Documents
You can edit the document names after they've been uploaded by clicking the Actions button on the right-hand side, and click Edit Nickname.

You may also delete documents by clicking the Actions on the right hand side of a document in the list, and click the Delete Document button (as shown above).
Important
You cannot recover a document after deleting it, you must re-upload the document.
Renaming Documents with Dash
Need to clean up a batch of file names like "Final_v3_REVISED.pdf"? Dash can rename your Data Library documents for you, one at a time or many at once. Just tell Dash what you want the new names to be!
Renaming with Dash works just like Edit Nickname: only the name shown in GovDash changes, and your original uploaded file stays the same. Each rename is also recorded in the document's history in the Document Details view.
Click the blue-starry Dash icon in the bottom right of GovDash to open Dash.
Open the Sources menu and make sure Documents is selected, so Dash can find and update your Data Library documents.
Ask Dash to rename your documents. For example: "Rename the document resume_jsmith_2024 to John Smith Resume" or "Rename all of my capability statements so they start with Capability Statement".
While Dash works, you'll see a Renaming documents status in the chat, followed by Renamed documents once your changes are saved.
Return to Data Library → Documents to see your updated document names.
Good to know
Dash can only rename documents you have permission to edit. If Dash can't rename one of the documents in your request, none of the names in that request are changed, so you can adjust your request and try again. Dash handles large batches automatically by working through them in groups of up to 100 documents.
Bulk Deletions
If you’d like to delete more than one file at once, use the checkboxes beside the file name column to make your selection, and the trash can icon within small black box to make your deletions.

What happens after I delete documents?
When you upload a document to GovDash, connections are automatically created in People, Companies, and Agencies tabs using the content within your document, such as key personnel, partner profiles, and customer details. When you delete a document, these connections are still present, meaning that we will not delete the records that were created from the document.
GovDash can still utilize these records without the associated documents, so if you’d like to ensure all traces of the documents are removed, please ensure the associated key personnel, companies, and agencies are deleted using the steps in our Help Center article here.
FAQ
What types of documents can I upload to the GovDash Data Library?
You can upload various types of documents including capability statements, resumes, technical documentation, and more.
Where can I find the option to upload files in GovDash?
You can find the option to upload files by hovering over Data Library on the left side of GovDash, selecting Documents, and clicking Upload Files in the top right.
How can I delete multiple documents at once?
To delete multiple documents, use the checkboxes beside the file names and click the trash can icon within the small black box that appears to delete your selections.
What happens if I accidentally delete a document?
If you delete a document, it cannot be recovered; you will need to re-upload it. When you upload the same file again, it keeps its original name, so it's easy to find in your Data Library.
Why does my document have a number next to the document name?
When you upload a file from your computer, GovDash names it after the file you picked. A number like "(1)" is only added when another document in your Data Library already has that same name, so you can tell the two apart. A few things to know:
Deleted documents don't count. If you delete a document and upload it again, it keeps its original name.
GovDash uses the first number that's free. For example, if you have "Proposal" and "Proposal (1)" and delete "Proposal", the next upload of that file is named "Proposal" again.
The file type isn't part of the name. Uploading "Proposal.pdf" and then "Proposal.docx" gives you "Proposal" and "Proposal (1)".
Documents that already have a number from an earlier upload keep their current name. To change it, click Actions → Edit Nickname (see Renaming and Deleting Documents above).
We recently changed how GovDash names re-uploaded files. If a document was given a number like "(1)" before this change, it keeps that number. To remove it, click Actions → Edit Nickname and rename the document.
Why do some documents show a lock and "No access"?
On the Documents tab of an opportunity, contract, person, company, agency, proposal, or deliverable, GovDash lists every document attached to that record. If your role doesn't include access to a document, you'll see its name with a lock icon and a No access label, along with its classification, status, tags, and dates. You can't open, select, or edit that document, and its Uploaded By column stays blank. When you search the list, documents you can't open are left out of the results. To get access, ask your team admin to update your role. Learn more in our Roles & Permissions article.